August 4, 2012
DIY Project Weekend: Create a Porch Swing You Can Sleep On

Enjoy peaceful mornings and lazy afternoons on this custom built, reinvented porch swing. Below are step-by-step directions.
Build the Bed Frame
- Attach the (01) sides to the (02) ends with glue and pocket hole screws (see Figure 1). Note: Use five pocket hole screws per joint for the main frame.
- Position the (03) braces so that they are flush with the (01) sides (as shown in Figure 2). Using glue and pocket hole screws, attach all of the (03) braces to the (01) sides and attach the outer (03) braces to both the (01) sides and to the (02) ends. Note: Use three pocket hole screws per joint when attaching to the (01) sides; use six pocket hole screws per joint when attaching to the (02) ends.
- Sand and apply a finish to the assembly. Allow to dry per the manufacturer’s instructions.
- Using screws included in the packaging, attach corner braces to the (01) sides, (02) ends, and (03) braces at each of the four inside corners.
- Attach the (04) bottom to the (03) braces with 1 1/4-inch screws (see Figure 3).
Attach the Hardware
- Position each lag eye bolt 5 1/2 inches in from both sides of each corner (see Figure 4). Pre-drill pilot holes to match the diameter of the screw shank (not the threads) for the lag eye bolts. Attach eight lag eye bolts to the (01)sides and (02) ends of the bed frame. When attaching the lag eye bolts, use a large screwdriver or pry bar for leverage, insert the end of the tool through the end of each lag eye bolt, and twist it into place.
- Predrill pilot holes to match the diameter of the screw shank (not the threads) for the lag eye bolts, and then attach four lag eye bolts to ceiling joists, one for each corner of the bed frame. To help minimize the amount of sway, position the bolts so that they are slightly beyond the bed frame dimensions.
- Attach a quick link to each lag eye bolt in the ceiling joists and to one end of each length of chain. (You’ll use one length of chain per bed frame corner.)

Hang the Bed
- Position the bed frame on two sawhorses or small stepladders directly underneath the four chains.
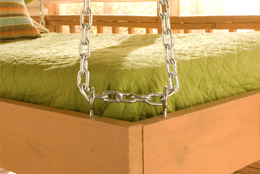
- Thread each chain through the two lag eye bolts on the corresponding corners, and attach the end of the chain to a chain link above it with a quick link. Once attached, the chains form a triangle at each corner (see Figure 4).
- Adjust the chains so that the bed (with mattress) is level and no higher than standard bed height (18 to 24 inches). Note: Do not store items underneath the bed to allow clearance. We recommend no more than two large adults sitting or one large adult lying on the bed at one time.
Illustrations

Click here for complete project details including the cut list, lumber and supplies.
Photo Credits: Lowe’s Creative Ideas
(Visited 193 times, 1 visits today)


